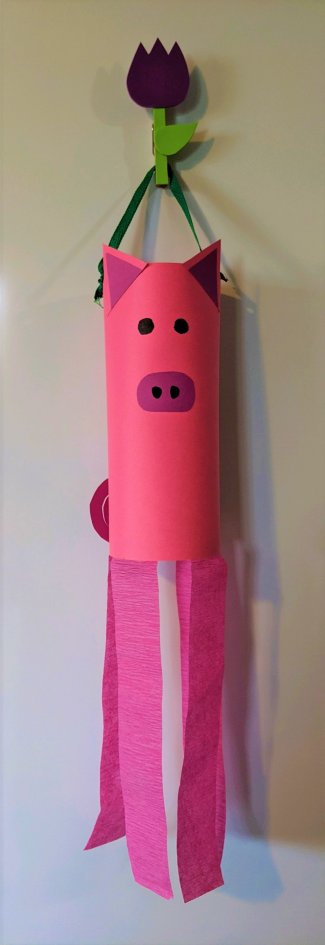
It’s time for another windsock activity, because if there is something we have plenty of in South Dakota – it’s wind! In an earlier episode of Make-It Monday, we made a floral windsock, so today we are mixing it up a bit and doing a farm animal version. The great thing about this is that it is customizable to your favorite farm animals, so you can make a big barnyard of windsocks! Like last time, these are easy to make with just a few items, so use what you have at home and follow these directions.
Find a helpful how-to video below:
Materials
- Construction Paper or Cardstock (a few options are listed below)
- Pig: light pink and dark pink
- Chick: yellow and orange
- Cow: white, black, and pink
- Black Marker
- Scissors
- Glue
- Streamers (optional)
- Stapler
- Hole Punch (optional)
- String/Ribbon (optional)
Instructions
- Using your marker and scissors, draw and cut out your features for your animal.
- Pig: make ears and tail out of light pink paper and a nose out of the dark pink paper. On your nose, make two nostrils with a black marker.
- Chick: make wings out of yellow paper and a beak and comb out of orange paper.
- Cow: make ears, spots, and a tail out of your black paper and a nose out of your pink paper.
- On a full sheet of background paper (light pink for the pig, yellow for the chick, and white for the cow), glue the parts you cut out in Step #1, centering facial features in the middle of the page, making sure to leave around an inch of blank space on both the left and right side.
- Add eyes using your black marker.
- Cut streamers (optional) for legs. I cut my streamers 12” long, but you can make them longer or shorter if you like. You will need four streamers for any animal that has four legs and two streamers for any animals that need two legs. If you don’t have streamers, you can use paper, ribbon, or string instead.
- Flip your sheet over and glue your streamers on the bottom of the backside, spacing them out accordingly.
- After everything is dry, curl your paper (face on the outside and streamers on the inside) into a cylinder (circle) shape with the left and right edges overlapping about an inch. Use your stapler to add two staples to the top and bottom to hold the shape.
- Using your hole punch, punch two holes on opposite sides of the top of your cylinder (circle). Cut a piece of ribbon or string (mine was 9” long) and make a knot at both holes to add a hanger. If you don’t’ have a hole punch or ribbon/string, you can use a strip of paper instead.
- Add your tail you cut during Step #1 to the back side of your animal.
- Find a place to hang your masterpiece – you’re done!
Make-It Monday projects will be posted each Monday (except for holidays) throughout the museum closure for COVID-19. For a full list of previous projects, visit Make-It Monday.
Questions? Contact Sarah, the museum's education coordinator.