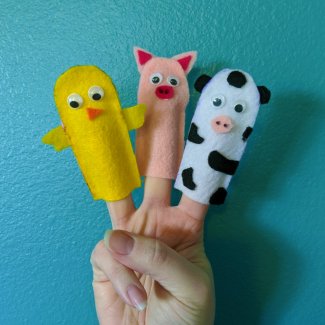
If your kiddos are looking to burn off some creative energy, this activity is for you! You can use just a few simple materials to let kids create fun farm animal characters to tell hours and hours of stories and adventures with. Check out the materials needed and instructions below, and make sure to watch the video if you want to see step-by-step instructions!
Find a helpful how-to video below:
Materials
- Felt (colors depend on what animals you are making)
- Pig: light pink and dark pink
- Chick: yellow and orange
- Cow: white, black, and pink
- Felt Tip Pen or Marker
- Ruler
- Scissors
- Glue
- Wiggle Eyes (optional)
Instructions
- Decide what animal(s) you want to make and gather the supplies above.
- Grab your felt (light pink for a pig, yellow for a chick, or white for a cow) and place your index/pointer finger at the edge of the felt. Using your pen or marker, trace your finger.
- After you are done tracing, take your ruler and mark a ½ inch around the outside of your finger outline.
- Use your scissors to cut out this shape.
- Using your marker, trace the shape in Step 4 out of the same color felt. This will be the front and back of your finger puppet body.
- Grab your glue and put a line of it around the outside edge of one side of the body. DO NOT glue the bottom/flat edge (you will need this open for your finger later). Place the other half of the body on top and let dry.
- While your body is drying, you can add in facial features. Glue your wiggle eyes on, or just use a black pen or marker to draw them on.
- Pig: Using the light pink felt, cut out two triangle ears and glue them on the back of the body. Using the dark pink felt, cut out a round nose and glue it under the eyes. You can use a black marker to add two nostrils on the nose.
- Chick: Using your yellow felt, cut out two wings and glue them on the back of the body. Lastly, take your orange felt and cut out a triangle to glue on under the nose for a beak.
- Cow: Using the pink felt, cut out a round nose and glue it under the eyes. You can use a black marker to add two nostrils to the nose. Next, take your black felt and cut out two ears to clue to the back of the body. Lastly, use your black felt to add a few cow spots and glue on the front of the body.
- After everything has had the chance to dry according to your glue’s directions, you are ready to have lots of fun with your puppets!
Make-It Monday projects will be posted each Monday (except for holidays) throughout the museum closure for COVID-19. For a full list of previous projects, visit Make-It Monday.
Questions? Contact Sarah, the museum's education coordinator.